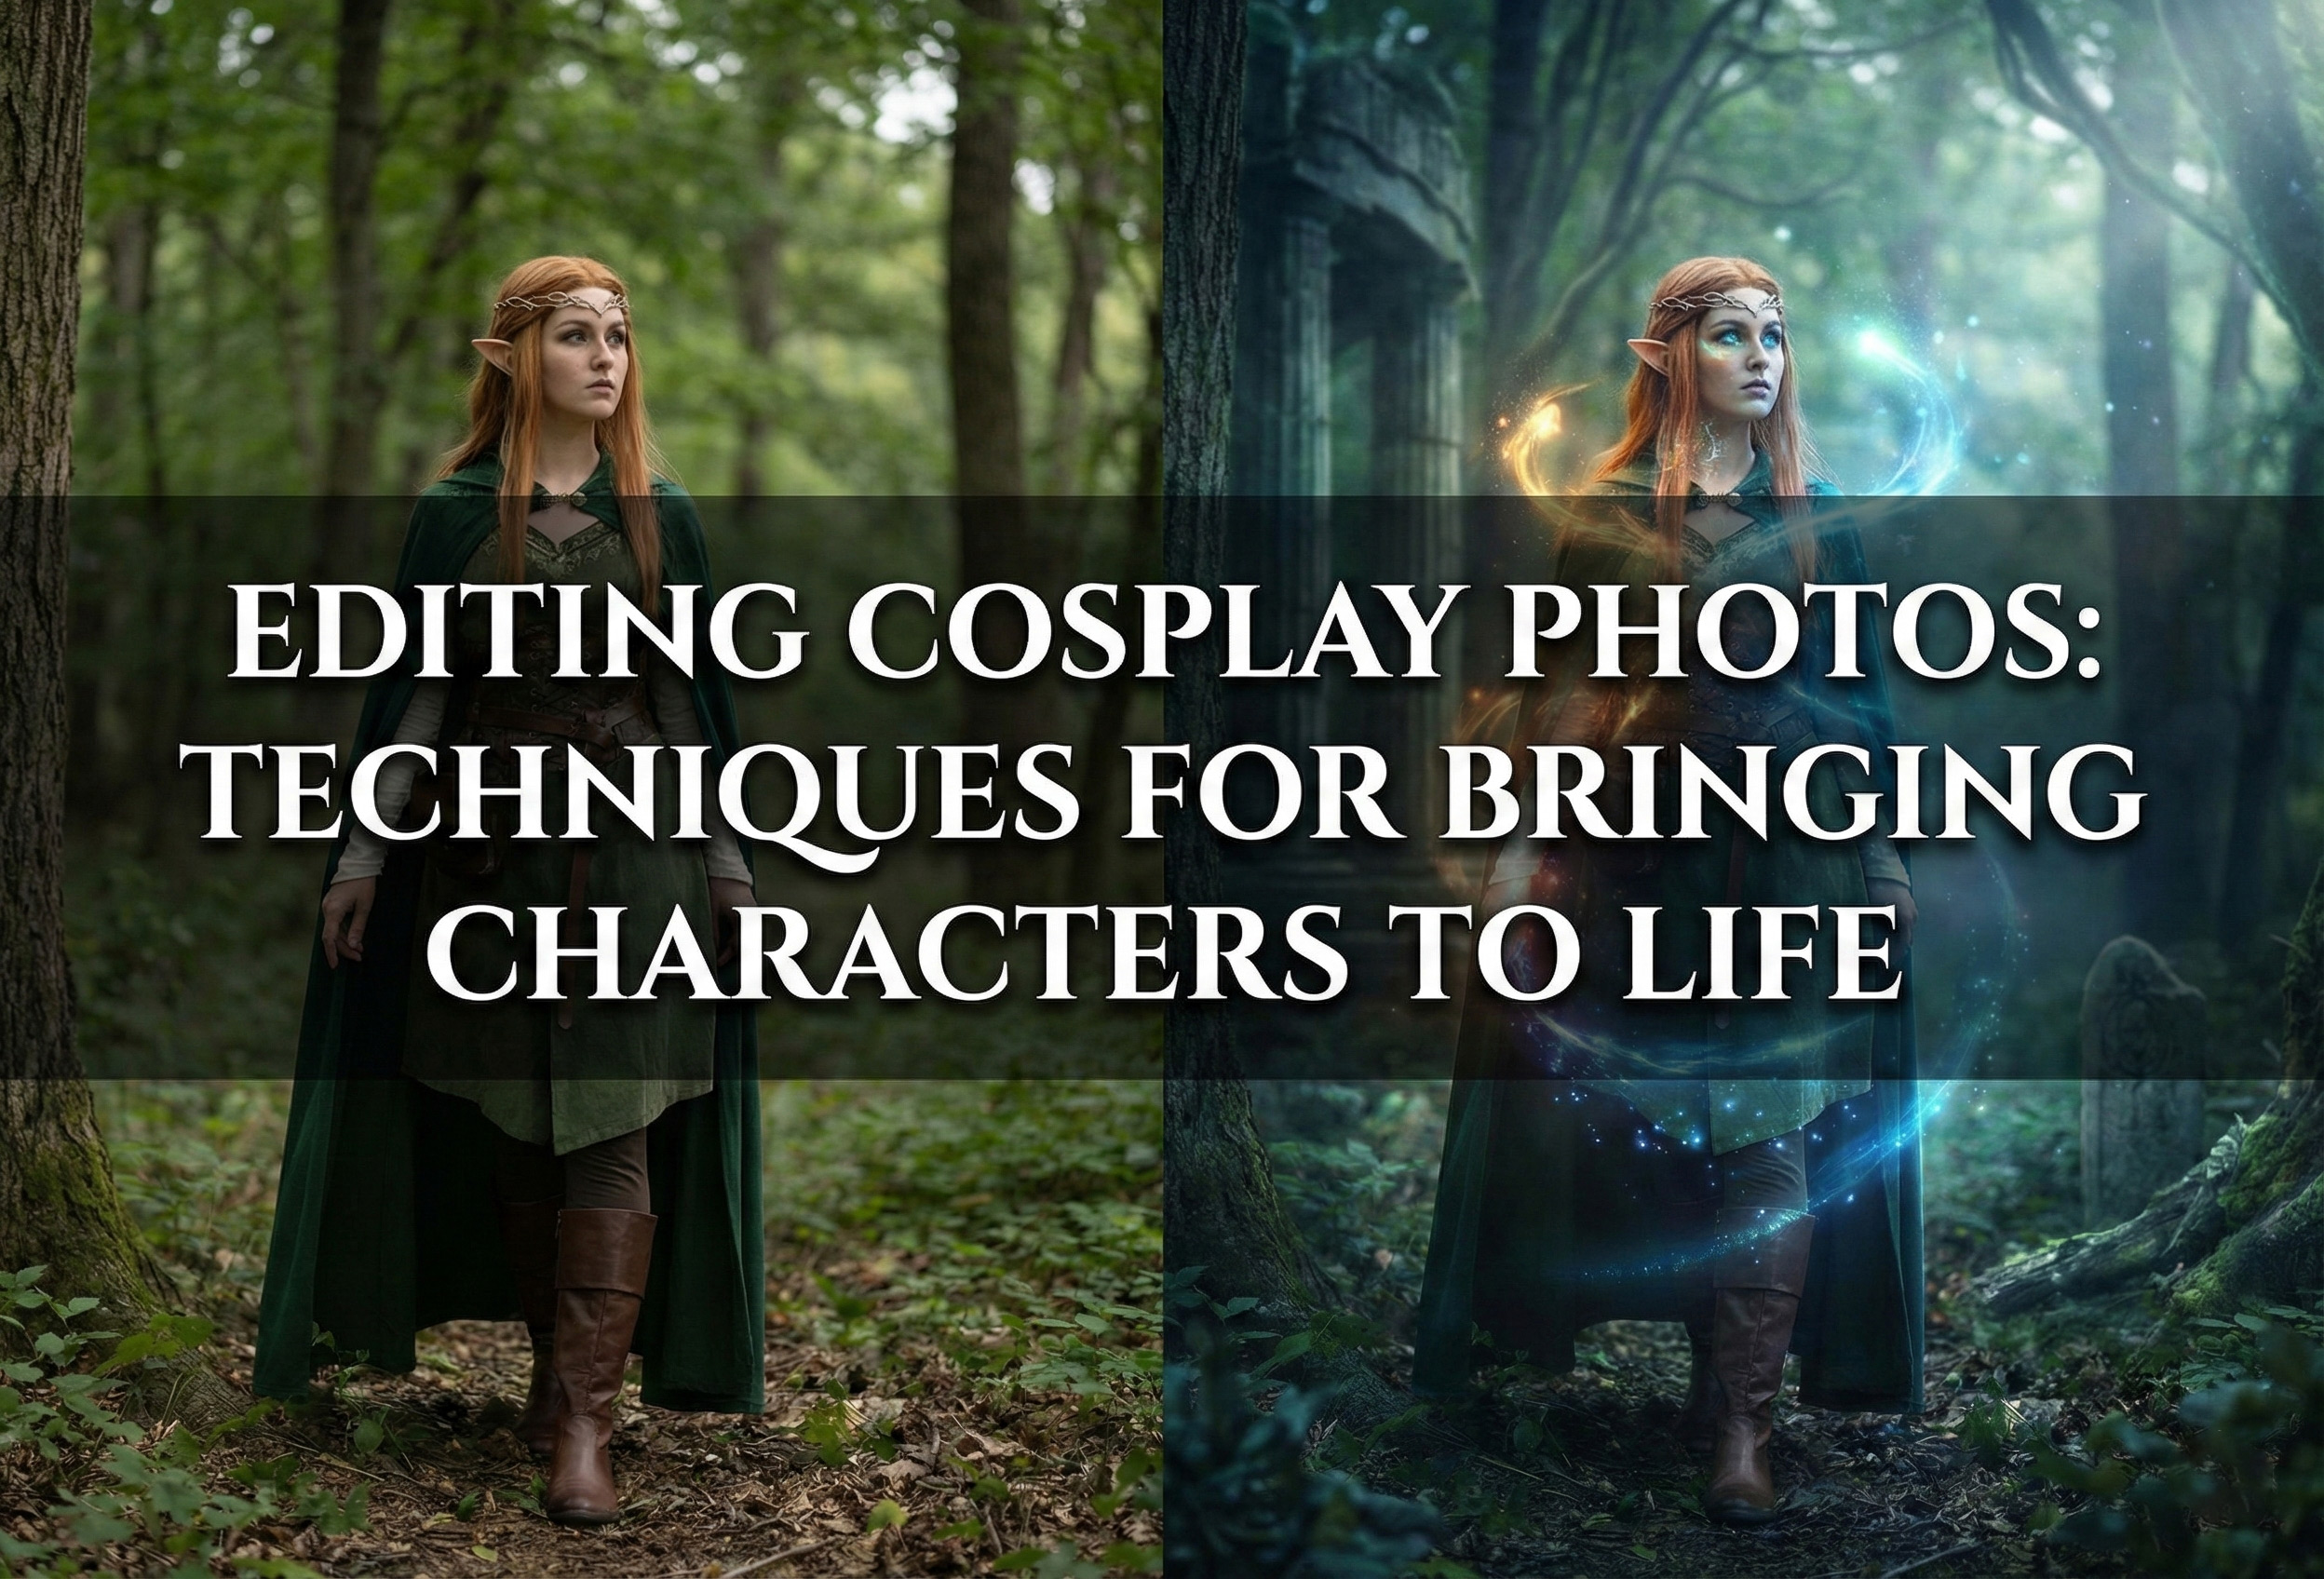
Post-processing is where good cosplay photography transforms into great cosplay photography, turning raw captures into polished images that truly bring fictional characters to life. While capturing quality images in-camera is essential, the editing process allows you to refine colors to match the character’s aesthetic, enhance costume details that represent countless hours of craftsmanship, add special effects that reflect the character’s powers or abilities, and create the overall mood and atmosphere that makes viewers feel like they’re looking at the character stepped out of their fictional world. Cosplay photo editing is a specialized skill that differs significantly from standard portrait retouching—it requires understanding of character aesthetics, familiarity with various fictional universes and their visual styles, technical proficiency with advanced editing tools, and the ability to enhance without over-processing or losing the authenticity that makes cosplay photography special. The best cosplay editing honors both the photographer’s creative vision and the cosplayer’s interpretation of the character, creating images that the cosplay community celebrates and shares. Whether you’re a photographer looking to improve your cosplay editing skills or a cosplayer wanting to understand what’s possible in post-processing, mastering these techniques elevates your work from simple documentation to true character portraiture. In this comprehensive guide, we’ll explore the complete cosplay photo editing workflow, from basic adjustments through advanced techniques like special effects and compositing, helping you develop the skills to create stunning final images that do justice to the artistry of cosplay.
Color Grading to Match Character Aesthetics
Color grading is perhaps the most impactful aspect of cosplay photo editing, as it sets the entire mood and determines whether your image feels authentic to the character’s world. Unlike standard portrait editing where you might aim for natural, realistic colors, cosplay editing often requires pushing colors in specific directions to match the visual aesthetic of the source material. Begin by researching the character’s typical color palette and the overall look of their series, game, or comic. Anime characters often exist in worlds with vibrant, saturated colors and high contrast, so editing for these characters typically involves increasing saturation, boosting contrast, and creating punchy, vibrant images with rich colors that pop off the screen. Conversely, post-apocalyptic or dystopian characters from series like The Walking Dead or Fallout benefit from desaturated, gritty color grading with reduced vibrance, shifted toward cooler or warmer tones depending on the specific aesthetic, and often with crushed blacks and lifted shadows for that characteristic faded look. Fantasy characters might call for warm, golden tones that evoke magic and wonder, with glowing highlights and rich earth tones, while cyberpunk or sci-fi characters often look best with cool blue or teal color grading, neon accent colors, and futuristic contrast. Gothic or dark characters benefit from moody processing with deep shadows, desaturated or monochromatic color schemes, and dramatic tonal contrast. Start your color grading in Lightroom or Camera Raw with global adjustments: set your white balance appropriately (warmer for heroic/fantasy characters, cooler for sci-fi/villains, or accurate for modern characters), adjust the temperature and tint sliders to establish the overall color mood, and use the HSL (Hue, Saturation, Luminance) panel to fine-tune individual colors—this is where you can make reds more vibrant for a fire character, shift blues toward teal for a cyberpunk aesthetic, or desaturate everything except one signature color for dramatic effect. The tone curve is your friend for creating specific looks: an S-curve increases contrast for punchy, dynamic images, lifting the blacks creates a faded film look popular in certain aesthetics, crushing the blacks creates deep, rich shadows for dramatic characters, and adjusting individual RGB curves allows precise color grading control. For more advanced color grading, move into Photoshop and use adjustment layers (Color Balance, Selective Color, Curves) which offer non-destructive, flexible control over your color palette. Consider creating custom LUTs (Look-Up Tables) or Lightroom presets for characters or series you photograph frequently, ensuring consistency across images and speeding up your workflow. Always reference the source material while editing—pull up screenshots from the anime, game cinematics, or comic panels to ensure your color grading feels authentic to that universe rather than imposing your own arbitrary aesthetic that conflicts with the character’s world.
Enhancing Costume Details and Textures
Cosplayers invest enormous time, skill, and resources into creating accurate, detailed costumes, and your editing should honor this craftsmanship by highlighting rather than obscuring these details. Different costume materials require different enhancement approaches to look their best in final images. For fabric costumes—the flowing dresses, capes, tunics, and cloth elements that comprise many cosplays—use local contrast enhancement through clarity or texture sliders to bring out weave patterns and fabric texture without creating harsh, over-sharpened edges. Dodge and burn (selectively lightening and darkening) adds dimension to fabric folds and draping, making flat-looking cloth appear three-dimensional and dynamic. Pay attention to how light naturally falls across fabric and enhance these tonal variations subtly. For leather elements—armor pieces, belts, boots, and accessories—increase local contrast more aggressively than with fabric to emphasize texture and weathering, use sharpening selectively on leather surfaces to bring out grain and detail, and consider subtle vignetting around leather pieces to make them stand out. Metallic elements like armor, weapons, props, and accessories require careful handling because metal reflects light intensely and can easily blow out to pure white or create distracting hotspots. Use the highlights slider to recover blown highlights in metallic surfaces, apply graduated filters or radial filters to selectively darken overly bright metal while maintaining dimension, dodge edges of metallic pieces to create rim lighting effects that separate them from backgrounds, and use local sharpening to emphasize engravings, battle damage, or surface details. For EVA foam armor (extremely common in cosplay construction), enhance the painted surface to minimize the foam texture if the cosplayer intended smooth armor, or embrace and enhance texture if it’s intentional weathering, use dodge and burn to create the illusion of depth and dimension that makes foam look like metal or hard material, and be careful not to over-sharpen foam surfaces which can emphasize construction seams unintentionally. Wigs, another staple of cosplay, benefit from selective sharpening that brings out individual fiber definition without creating a crunchy, over-processed look, color refinement to ensure the wig color matches the character’s canonical hair color, and sometimes frequency separation to smooth any obvious wig cap edges or harsh hairline transitions while maintaining texture. Use the detail panel in Lightroom or Smart Sharpen in Photoshop with masking to apply sharpening only where it enhances (costume details, props, facial features) while avoiding areas where it creates problems (smooth skin, out-of-focus backgrounds). Create luminosity masks in Photoshop for precise control over which tonal ranges receive which adjustments—this allows you to enhance bright metallic highlights without affecting shadow detail, or vice versa.
Working With Different Materials and Special Considerations
Beyond basic costume enhancement, certain materials and elements present unique editing challenges and opportunities in cosplay photography. Transparent or translucent materials like sheer fabrics, mesh, organza, or clear resin pieces require careful exposure management to maintain their see-through quality without completely losing them to overexposure. Use subtle dodging to define edges while keeping the interior transparent, adjust local contrast to make the material visible without making it opaque, and be cautious with clarity or texture adjustments which can make transparent materials look muddy. Reflective or mirrored surfaces—chrome armor, mirrored sunglasses, polished weapons—pick up everything in the environment including you, your equipment, and unwanted elements. Clone stamp and healing brush tools become essential for removing photographer reflections and unwanted environmental elements, content-aware fill can remove larger reflections and replace them with appropriate reflective content, and sometimes manual painting or compositing is necessary to create clean, believable reflective surfaces. For illuminated elements—LED lights in props or costumes, glowing eyes, energy weapons, or light-up accessories—enhance the glow effect by selecting the light source and brightening it further, add outer glow layer styles or manually painted glow to extend the light effect beyond the physical LED, adjust color to ensure the glow matches the intended color (LEDs often appear cooler than desired), and create light spill on surrounding costume elements or the cosplayer’s face to sell the illusion that the prop is genuinely illuminating the scene. Body paint and makeup, common in alien, fantasy, or creature cosplays, requires retouching that maintains the artistic makeup work while addressing skin imperfections. Use frequency separation to smooth skin texture issues without affecting makeup color or patterns, clone stamp to fix makeup smudges or uneven application, and color correction to ensure makeup colors appear vibrant and accurate to the character design. Prosthetics and special effects makeup benefit from subtle enhancement that makes them appear more realistic—add shadows at the edges where prosthetics meet skin to blend seams, dodge highlights on prosthetic surfaces to create dimension, and match skin texture between prosthetic and natural skin through careful clone stamping or texture overlay. Contact lenses, which many cosplayers use to achieve character-accurate eye color, often appear dull or less vibrant than intended in photos. Enhance eye color through HSL adjustments targeting the specific lens color, dodge the eyes slightly to brighten and draw attention, and sharpen eyes specifically as they’re the focal point of character expression—but avoid the temptation to make eyes unnaturally bright or saturated, which looks artificial and distracting.
Adding Special Effects and Character Powers
Many characters possess supernatural abilities, magical powers, or technological enhancements that create visual effects in their source material, and recreating these effects in post-processing takes cosplay photography from good to spectacular. However, special effects should enhance rather than overwhelm, and should feel consistent with the character’s canonical abilities rather than arbitrary additions. For magical or energy effects—glowing hands for spellcasters, energy auras for powered characters, or magical circles and runes—create glowing effects by painting on new layers with soft brushes in appropriate colors, set these layers to blend modes like Screen, Add, or Linear Dodge for luminous quality, add outer glow layer styles for ambient light spread, and reduce opacity to taste for subtle or dramatic effects depending on the character. Particle effects—magical sparkles, energy particles, floating embers, or technological holographic elements—can be created with custom brushes or added from stock particle overlays, scattered appropriately around the character or emanating from hands/weapons, varied in size and opacity for depth and realism, and color-matched to the character’s power signature (blue for ice, red for fire, purple for dark magic, etc.). Weapon enhancements transform ordinary prop weapons into powered versions: add glowing edges to swords or blades using dodge tools or painted light on new layers, create energy trails for weapons in motion using motion blur or manual painting, add electricity effects using specialized brushes or filters for lightning-powered weapons, and create magical inscriptions or runes that glow along weapon surfaces. Elemental effects bring character powers to life—fire effects can be added from stock images or created with custom brushes, masked carefully to interact realistically with the scene and the cosplayer, water or ice effects created through blue-tinted overlays, splashes, or crystalline additions, wind effects shown through added motion blur to hair, fabric, and environmental elements, and darkness or shadow manipulation shown through painted shadows or light absorption effects. Eye effects are particularly impactful for many characters: glowing eyes created by selecting the iris area, filling with appropriate color, setting to Screen or Add blend mode, and adding outer glow, changed eye colors for characters with supernatural vision or powers, adding reflections or patterns within eyes for mystical characters, and creating completely transformed eyes for demonic, robotic, or alien characters through painting and texturing. Environmental effects enhance the overall scene and ground the character in their world: dramatic skies replaced or enhanced through sky replacement tools or manual compositing, atmospheric fog or mist added through gradient overlays with reduced opacity and blend modes, god rays or light beams created using custom brushes or the lighting effects filter, and weather elements like rain, snow, or falling leaves added from stock elements or brush sets. The key to effective special effects is restraint and realism—effects should feel like they belong in the scene rather than obviously pasted on, should interact with the environment (glows illuminate nearby surfaces, magical effects cast colored light on faces, energy distorts air around it), and should enhance the storytelling rather than serving as a showcase of Photoshop skills.
Skin Retouching While Preserving Character Makeup
Retouching skin in cosplay photography requires a delicate balance—you want to address temporary blemishes and imperfections while preserving the intentional character makeup, natural skin texture, and the cosplayer’s authentic appearance. Begin with an understanding of what should and shouldn’t be retouched: temporary issues like acne, blemishes, convention floor dirt, makeup smudges, or unflattering shadows are appropriate to address, while permanent features like moles, freckles, scars, or skin texture should generally be preserved unless the cosplayer specifically requests removal. The gold standard for skin retouching is frequency separation, a technique that separates texture from color and tone, allowing you to smooth color variations and even out skin tone without destroying the natural skin texture that makes people look human rather than plastic. To use frequency separation, duplicate your background layer twice, blur the lower copy to remove texture (Gaussian Blur 3-5 pixels typically works), set the upper layer to subtract mode temporarily to extract texture, change the blend mode to Linear Light, and now you can work on tone/color in the lower layer and texture in the upper layer independently. On the color/tone layer, use a soft brush with low opacity to blend and even out discoloration, reducing redness, dark circles, or uneven skin tone. On the texture layer, use the clone stamp or healing brush at low opacity to minimize extreme texture issues without completely eliminating skin texture. An alternative to frequency separation is the Portraiture plugin or similar skin smoothing tools, but use these cautiously with low strength settings as they can easily create the “plastic skin” look that appears unnatural. For cosplay specifically, be extremely careful around character makeup—face paint, contouring, special effects makeup, and artistic elements are intentional artistic choices that should be preserved or enhanced, never smoothed away. If makeup has smudges or imperfections, fix these with clone stamp rather than overall smoothing. Use dodge and burn for sculpting facial dimension—subtly lighten the bridge of the nose, cheekbones, forehead center, and chin while darkening the sides of the nose, hollows of cheeks, temples, and jawline. This creates dimension and can even enhance the cosplayer’s resemblance to the character through strategic facial shaping. Eye enhancement draws attention to the focal point of expression: brighten the whites of eyes slightly (without making them pure white which looks unnatural), sharpen the iris and pupil for clarity and impact, enhance eye color through HSL adjustments or selective saturation, and ensure catchlights (light reflections) are present and positioned appealingly. Teeth whitening is often appropriate but should be subtle—teeth should look clean and healthy, not glowing or unnaturally white. Body retouching follows similar principles: address temporary issues like bruises, scrapes, or tan lines that distract from the character, but maintain natural body shape and proportions unless the cosplayer specifically requests alterations. The goal is creating images where the cosplayer looks like their best self embodying the character, not like an AI-generated impossible standard.
Looking for professional cosplay photo editing that brings your characters to life? Uncleshoot Photography in Bekasi offers comprehensive editing services for cosplay photographers and cosplayers, from color grading and costume enhancement to special effects and complete post-processing workflows. Whether you need editing for convention shots or epic outdoor photoshoots, we understand character aesthetics and deliver stunning final images.
Leave a Reply
You must be logged in to post a comment.